Featured post

Introduction to Apache Flink

Apache Flink is a robust, open-source data processing framework that handles large-scale data streams and batch-processing tasks. One of the critical features of Flink is its architecture, which allows it to manage both batch and stream processing in a single system.

Consider a retail company that wishes to analyse sales data in real-time. They can use Flink’s stream processing capabilities to process sales data as it comes in and batch processing capabilities to analyse historical data.

The JobManager is the central component of Flink’s architecture, and it is in charge of coordinating the execution of Flink jobs.

For example, if a large amount of data is submitted to Flink, the JobManager will divide it into smaller tasks and assign them to TaskManagers.
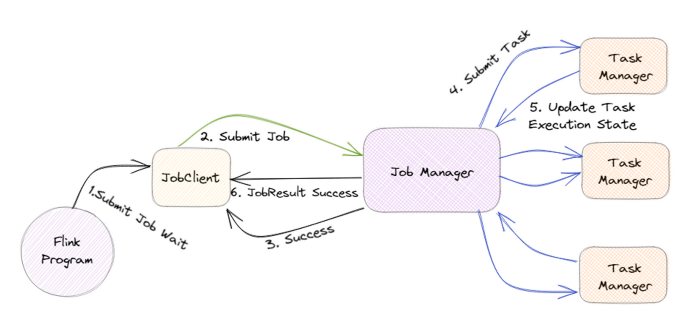
TaskManagers are responsible for executing the assigned tasks, and they can run on one or more nodes in a cluster. The TaskManagers are connected to the JobManager via a high-speed network, allowing them to exchange data and task information.

For example, when a TaskManager completes a task, it will send the results to the JobManager, who will then assign the next task.

Flink also has a distributed data storage system called the Distributed Data Management (DDM) system. It allows for storing and managing large data sets in a distributed manner across all the nodes in a cluster.

For example, imagine a company that wants to store and process petabytes of data, they can use Flink’s DDM system to store the data across multiple nodes, and process it in parallel.

Flink also has a built-in fault-tolerance mechanism, allowing it to recover automatically from failures. This is achieved by maintaining a consistent state across all the nodes in the cluster, which allows the system to recover from a failure by replaying the state from a consistent checkpoint.

For example, if a node goes down, Flink can automatically recover the data and continue processing without any interruption.

In addition, Flink also has a feature called “savepoints”, which allows users to take a snapshot of the state of a job at a particular point in time and later use this snapshot to restore the job to the same state.

For example, imagine a company is performing an update to their data processing pipeline and wants to test the new pipeline with the same data. They can use a savepoint to take a snapshot of the state of the job before making the update and then use that snapshot to restore the job to the same state for testing.

Flink also supports a wide range of data sources and sinks, including Kafka, Kinesis, and RabbitMQ, which allows it to integrate with other systems in a big data ecosystem easily.

For example, a company can use Flink to process streaming data from a Kafka topic and then sink the processed data into a data lake for further analysis.

The critical feature of Flink is that it handles batch and stream processing in a single system. To support this, Flink provides two main APIs: the Dataset API and the DataStream API.

The Dataset API is a high-level API for Flink that allows for batch processing of data. It uses a type-safe, object-oriented programming model and offers a variety of operations such as filtering, mapping, and reducing, as well as support for SQL-like queries. This API is handy for dealing with a large amount of data and is well suited for use cases such as analyzing historical sales data of a retail company.

On the other hand, the DataStream API is a low-level API for Flink that allows for real-time data stream processing. It uses a functional programming model and offers a variety of operations such as filtering, mapping, and reducing, as well as support for windowing and event time processing. This API is particularly useful for dealing with real-time data and is well-suited for use cases such as real-time monitoring and analysis of sensor data.

In conclusion, Apache Flink’s architecture is designed to handle large-scale data streams and batch-processing tasks in a single system. It provides a distributed data storage system, built-in fault tolerance and savepoints, and support for a wide range of data sources and sinks, making it an attractive choice for big data processing. With its powerful and flexible architecture, Flink can be used in various use cases, from real-time data processing to batch data processing, and can be easily integrated with other systems in a big data ecosystem.

Preparing for a System Design Interview: Focus on Trade-offs, Not Mechanics

Are you getting ready for a system design interview? It is critical to approach it with the proper mindset and preparation. System design deals with components at a higher level, so staying out of the trenches is vital. Instead, interviewers are looking for a high-level understanding of the system, the ability to identify key components and their interactions, and the ability to weigh trade-offs between various design options.

During the interview, pay attention to the trade-offs rather than the mechanics. You must make decisions about the system’s scalability, dependability, security, and cost-effectiveness. Understanding the trade-offs between these various aspects is critical to make informed decisions.

Here are a few examples to prove my point:

  • If you’re creating a social media platform, you must choose between scalability and cost-effectiveness. Should you, for example, use a scalable but expensive cloud platform or a less expensive but less scalable hosting service?
  • When creating an e-commerce website, you must make trade-offs between security and usability. Should you, for example, require customers to create an account with a complex password or let them checkout as a guest with a simpler password?
  • When designing a transportation management system, you must balance dependability and cost-effectiveness. Should you, for example, use real-time data to optimise routes and minimise delays, or should you rely on historical data to save money?

Install Apache Flink on Multi-node Cluster: RHE8

Preparation:

  • Set up a password less SSH connection between the nodes for easy communication

Setting up the cluster nodes:

Install the latest version of Java on all nodes in the cluster. 

sudo yum install java-1.8.0-openjdk-devel

Install Apache ZooKeeper on all nodes in the cluster.

ZooKeeper is used for coordination between the nodes. 

Install ZooKeeper 3.6.2:

wget https://downloads.apache.org/zookeeper/zookeeper-3.6.2/apache-zookeeper-3.6.2-bin.tar.gz 

tar -xvf apache-zookeeper-3.6.2-bin.tar.gz 

sudo mv apache-zookeeper-3.6.2-bin /usr/local/zookeeper

Installing Apache Flink:

Download the latest version of Apache Flink (1.16.1) from the official website:

wget https://mirrors.ocf.berkeley.edu/apache/flink/flink-1.16.1/flink-1.16.1-bin-scala_2.12.tgz

Unpack the archive to a directory on all nodes in the cluster:

tar -xvf flink-1.16.1-bin-scala_2.12.tgz sudo mv flink-1.16.1 /usr/local/flink

Configuring the Apache Flink cluster:

  • Create a copy of the flink-conf.yaml configuration file and customize it:
cd /usr/local/flink/conf 
cp flink-conf.yaml flink-conf.yaml.orig
  • Configure the jobmanager.rpc.address setting to the hostname or IP address of the master node.
  • Configure the taskmanager.numberOfTaskSlots setting to the number of parallel tasks that each task manager should run.
  • Configure the taskmanager.memory.process.size setting to the amount of memory that each task manager should use.

for example:

taskmanager.memory.process.size: 4GB
taskmanager.numberOfTaskSlots: 30

Configure the high-availability section to set up a high-availability setup using ZooKeeper:

The zoo.cfg file is the configuration file for ZooKeeper, which is used to set up a high-availability setup for Apache Flink.

The following details need to be added to this file:

  1. Data Directory: Specify the directory where ZooKeeper will store its data.
  2. Client Port: Specify the port that ZooKeeper will listen on for client connections.
  3. Server List: Specify a list of servers in the ZooKeeper ensemble, including the hostname and client port for each server.
  4. Tick Time: Specify the length of a single tick, which is the basic time unit used by ZooKeeper.
  5. Init Limit: Specify the number of ticks that the initial synchronization phase between a ZooKeeper server and its followers can take.
  6. Sync Limit: Specify the number of ticks that a follower can be behind a leader.
  7. Snapshot Counter: Specify the number of transactions that can be processed before a snapshot of the ZooKeeper state is taken.

Here’s an example of a basic zoo.cfg file:

dataDir=/tmp/zookeeper 
clientPort=2181 

server.1=localhost:2888:3888 
server.2=localhost:2889:3889 
server.3=localhost:2890:3890 

tickTime=2000 
initLimit=10 
syncLimit=5 
snapCount=1000

Add the following lines to the flink-conf.yaml file

high-availability: zookeeper 
high-availability.zookeeper.quorum: host1:port,host2:port,host3:port 
high-availability.zookeeper.path.root: /flink:

Note: Replace host1:port, host2:port, and host3:port with the hostnames and ports of the ZooKeeper nodes in your cluster.

Starting the cluster:

Start ZooKeeper on all nodes in the cluster:

cd /usr/local/zookeeper/bin ./zkServer.sh start

Start the JobManager on the master node by running the following command:

cd /usr/local/flink/bin ./standalone-job.sh start

Start the TaskManagers on all other nodes by running the following command on each node:

cd /usr/local/flink/bin ./taskmanager.sh start 

 Here are the additional steps for setting up TLS/SSL/HTTPS :

  1. Obtain a certificate
  2. Install the certificate: Copy the certificate and private key files to a location on each node in the cluster. The location should be accessible to the user that runs the Flink process.
  3. Install OpenSSL: If it’s not already installed, install the OpenSSL package on each node in the cluster. You can do this by running the following command:
sudo yum install openssl

Configure Flink: Modify the flink-conf.yaml file on each node to enable SSL/TLS and specify the location of the certificate and private key files. Here is an example configuration:

security.ssl.enabled: true 
security.ssl.certificate: /path/to/cert.pem 
security.ssl.private-key: /path/to/key.pem

Restart the nodes: After making the changes to the configuration file, restart the Job Manager and Task Manager nodes.

Verify the configuration: You can verify that the configuration is working by accessing the Flink web UI using an HTTPS URL (e.g. https://<jobmanager_host&gt;:8081).The browser should show that the connection is secure and that the certificate was issued by a trusted CA.

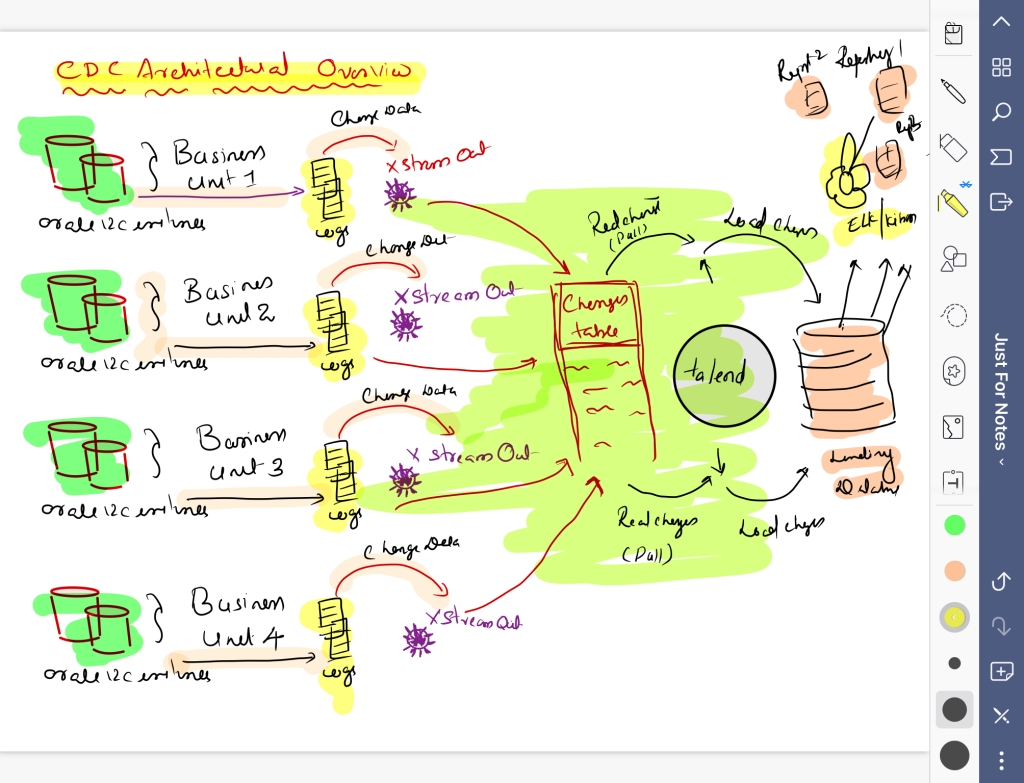
CDC using Oracle XStream mode & Talend

Change data capture is an advanced technology for data replication and loading that reduces data warehousing programs’ time and resource costs and facilitates real-time data integration across the enterprise. By detecting changed records in data sources in real-time and propagating those changes to an ETL data warehouse, change data capture can sharply reduce the warehouse’s need for bulk load updating.

Why do you need to capture and move the changes in your data?

• Populating centralized databases, data marts, data warehouses, or data lakes
• Enabling machine learning, advanced analytics and AI on modern data architectures like Hadoop and Spark
• Enabling queries, reports, business intelligence or analytics without production impact
• Feeding real-time data to employee, customer or partner applications
• Keeping data from siloed databases in sync
• Reducing the impact of database maintenance, backup or testing
• Re-platforming to new database or operating systems
• Consolidating databases

How does Talend CDC work?

Talend CDC is based on a publish/subscribe model, where the publisher captures the changes in data in real-time. Then it makes it available to the subscribers which can be databases or applications. 

The Oracle Database records changes in the transaction log in commit order by assigning a System Commit Number (SCN) to every transaction.

Three different CDC modes are available in Talend Studio:

Trigger: this mode is the by-default mode used by CDC components.

Redo/Archive log: this mode is used with Oracle v11 and previous versions.

XStream: this mode is used only with Oracle v12 with OCI.

Benefits of Log-Based Change Data Capture:

Redo/Archive log: this mode is used with Oracle v11 and previous versions

XStream: this mode is used only with Oracle v12 with OCI

The biggest benefit of log-based change data capture is the asynchronous nature of CDC:

Changes are captured independent of the source application performing the changes.

• The additional performance impact on the source system is low

• CDC enables the implementation of near real-time architectures

• No significant changes to the application in the source system CDC reduces the amount of data transmitted over the network

About Oracle Xstream:

XStream consists of Oracle Database components and application programming interfaces (APIs) that enable client applications to receive data changes from an Oracle database and send data changes to an Oracle database.

These data changes can be shared between Oracle databases and other systems. The other systems include non-Oracle databases, non-RDBMS Oracle products, file systems, third party software applications,and so on. A client application is designed by the user for specific purposes and use cases.

XStream consists of two major features: XStream Out and XStream In. 

XStream Out provides Oracle Database components and APIs that enable you to share data changes made to an Oracle database with other systems. XStream Out can retrieve both data manipulation language (DML) and data definition language (DDL) changes from the redo log and send these changes to a client application that uses the APIs.

XStream In provides Oracle Database components and APIs that enable you to share data changes made to other systems with an Oracle database. XStream can apply these changes to database objects in the Oracle database

Reference:

https://help.talend.com/r/6lpaT_M~MEVrltFQcrPe4g/Ni3tTLbdYnf7GCwNT5F5rQ

http://docs.oracle.com/cd/E11882_01/server.112/e16545/toc.htm

Moving data from oracle to HDFS

I divided the scope into two stages:

Stage -1 | Initial data load from Oracle database to HDFS (for bulk load)

  • Here I used oracle native utility (Copy2hadoop) for reducing the friction

Stage -2 | Synchronize data from Oracle to Hadoop (delta changes)

  • Here I used SharePlex, comparatively effective third party tool (Quest/Dell) for data replication

Stage -1 | Initial data load from Oracle database to HDFS

Generally, we have two tools for data movement from the Oracle Database to HDFS

Sqoop and Copy2Hadoop :

Copy2Hadoop has advantages over sqoop, In my case we have complex query(Functions, PL/SQL, Joins) or even views (like a sub-case for complex queries). So, it is recommended to use Copy2Hadoop for the initial load. Since it is oracle native utility it will save our time and effort.

Copy2Hadoop creates datapump files that could have any Oracle datatype which is supported by Oracle External table and store data in Oracle’s datatype. When we convert datatype from Oracle format to the Java format (like sqoop does) there is always risk that some information would be converted incorrectly. Copy2Hadoop insures us from that.

Below are the high-level steps to copy the data:

Note:
Create Oracle Data Pump files from Oracle Database table data that we want to move. 
We can do this by exporting the data from the Oracle Database table using the oracle_datapump
access driver (Using Oracle Data Pump files generated by other database utilities will
not be accessible by Hive tables.  We need to use the oracle_datapump access driver to export the data.)

• Create Oracle Data Pump files and the ORACLE_DATAPUMP access driver.

• Copy the Oracle Data Pump files from source system to HDFS.

• Create Hive tables to read the Oracle Data Pump files.

What Is Copy to Hadoop?
Oracle Big Data SQL includes the Oracle Copy to Hadoop utility. This utility makes it simple to identify and copy Oracle data to the Hadoop Distributed File System. It can be accessed either through a command-line interface or via Oracle SQL Developer. Data exported to the Hadoop cluster by Copy to Hadoop is stored in Oracle Data Pump format. This format optimizes queries thru Big Data SQL:

• The data is stored as Oracle data types – eliminating data type conversions

• The data is queried directly – without requiring the overhead associated with Java SerDes

After generating Data Pump format files from the tables and copying the files to HDFS, you can use Apache Hive to query the data. Hive can process the data locally without accessing Oracle Database. When the Oracle table changes, you can refresh the copy in Hadoop. Copy to Hadoop is primarily useful for Oracle tables that are relatively static, and thus do not require frequent refreshes.

Copy to Hadoop is licensed under Oracle Big Data SQL. You must have an Oracle Big Data SQL license in order to use utility

Stage -2 | Synchronize data from Oracle to Hadoop

Using SharePlex to replicate the data in near real-time.

What is SharePlex ?

SharePlex is the complete enterprise solution for Oracle database replication, including high availability, scalability, data integration and reporting use cases.

Why SharePlex ?

• Redo Log Based Database Replication
• Read the redo log for changes
• Ship the changes from source to target in near-real time
• Requires source and target have identical data to start
• Backup/copy consistent to an SCN
• Maintain synchronization between databases

SharePlex architecture

Docker – Essential Commands

CommandsDescription
docker psList all running containers
docker ps -aList all containers stopped, running
docker stop container-idStop the container which is running
docker start container-idStart the container which is stopped
docker restart container-idRestart the container which is running
docker port container-idList port mappings of a specific container
docker rm container-id or nameRemove the stopped container
docker rm -f container-id or nameRemove the running container forcefully
docker pull image-infoPull the image from docker hub repository
docker pull Pull the image from docker hub repository
docker exec -it container-name /bin/shConnect to linux container and execute commands in container
docker rmi image-idRemove the docker image
docker logoutLogout from docker hub
docker login -u username -p passwordLogin to docker hub
docker statsDisplay a live stream of container(s) resource usage statistics
docker top container-id or nameDisplay the running processes of a container
docker versionShow the Docker version information